> For the complete documentation index, see [llms.txt](https://spsvn.gitbook.io/product-docs-1/llms.txt). Markdown versions of documentation pages are available by appending `.md` to page URLs; this page is available as [Markdown](https://spsvn.gitbook.io/product-docs-1/huong-dan-cai-dat-va-cau-hinh-quan-tri-vien/cau-hinh-he-thong/thiet-lap-vai-tro-roles-group.md).
# Thiết lập Vai trò - Roles Group
**Cách 1: Nhập thông tin trực tiếp trên phần mềm:**
1. Từ Menu Setting chọn Vai trò
2. Chọn + Thêm mới để thêm mới 1 vai trò
3. Nhập thông tin vai trò theo thứ tự các bước trên hình
1. Tiêu đề: Tên vai trò
2. Mô tả: mô tả về chức năng nhiệm vụ của vai trò (tùy chọn)
3. WorkGroup= Yes: nếu vai trò này lặp lại giống nhau trong nhiều workgroup ( nếu chọn Yes) tính năng sẽ kích hoạt đi theo Workgroup
4. ***Code***: Mã Vai trò
*Lưu ý*: Mã là giá trị duy nhất, viết liền không dấu và dùng để tham chiếu trong điều kiện. Khuyến nghị để Code ngắn gọn, dễ hiểu và có quy luật.
4. Chọn \: để lưu các thông tin đã nhập
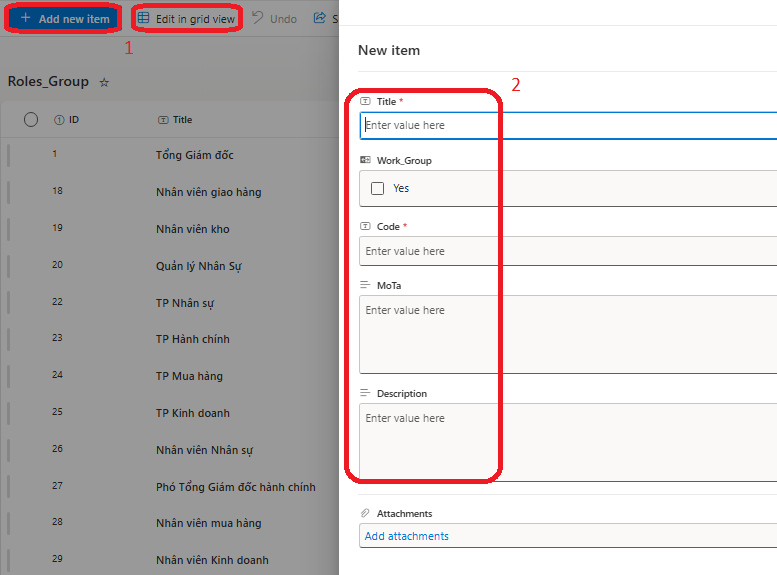
5. **Cách 2: Nhập các thông tin trên SharePoint list:**
6. Từ menu **Setting**, chọn **Roles Group**:
7. Chọn **SharePoint List**:
3. Từ màn hình của list **Roles Group**, chọn **+ Mới** để thêm từng chức danh hoặc **Chỉnh sửa ở dạng xem lưới** để thêm nhiều chức danh một lúc
4. Nhập các thông tin tương tự như khi thêm mới trên phần mềm.
5. Nếu các thông tin mới nhập không hiện ra trong danh sách, Chọn **Admin**. Danh sách các Roles Group sẽ hiển thị trong list.